
It is well known that each detector has its own sensitivity in detecting light (Quantum efficiency). This affects automatically the spectra of light detected by spectrometers. For example, in general, most CCD detectors can’t detect photons of wavelengths lower than 350nm or higher than 1050nm.
Nevertheless, Spectragryph software permits correct spectra intensity for known Standard light sources, for instance from NIST. It is a calibration light source with a known absolute emission spectrum.
Steps to correct intensity in Spectragryph:
- Acquire the spectrum of the calibration light source.
- Upload the absolute spectrum of the calibration light source. Please, note that Thunder Optics provides only a wavelengths calibration file.
- Go to the tab “Transform”, then make a division of the acquired spectrum by the reference spectrum at the “Divide” option:
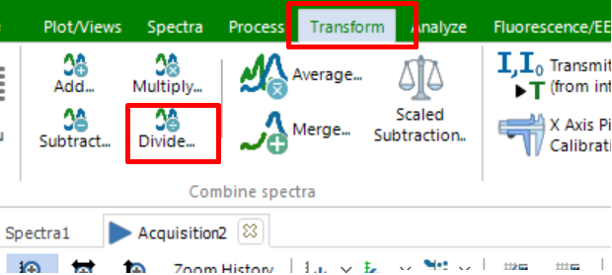
- Save a file with obtained correction curve on the computer.
- Go to the “Acquire” tab, then the “Correction of detector sensitivity” option, and select the saved file (Step 5) by “Load the Correction Curve”.
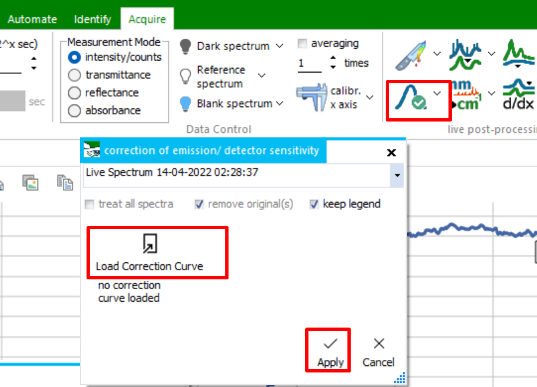
- Load the spectrum of the calibration light source and “Apply”
As a result, all the spectra will be corrected in intensity from the Quantum efficiency. UV and IR intensity will be increased and appear on the new spectra.
We recommend open-source software Theremino which is available in multiply languages. https://thunderoptics.fr/theremino_spectrometer-3-1/
Take a moment to learn documentation and calibrate the unit before taking measurements. 
I am not able to connect my Thunder Optics SMA-E (purchased Nov 2021) to Spectragryph (v1.2.15 on win10). When I select USB/Thunderoptics and then click Connect, I get a warning message “No connection established” followed by an error message “Floating point division by zero”. Could someone help?
Dear Jeroen,
Likely there is a communication problem between software and your spectrometer.
The computer detects the spectrometer as a video device which makes sense to pay attention to the performance of your video card and video codecs correct work.
We recommend 1. Reinstall the software 2. Try another computer.
Please, do not hesitate to contact support@thunderoptics.fr for more details regarding the error.
Support Team.
I have the Thunder Optics SMA-E model and works well with SW also mine came with the Spectrogryph, a full feature, fully functional software which is available free on a limited trial. Contact tech support with your ser and they will send the docs for yours.
I bought the SMA Spectrometer before about 2 years but I can’t find the calibration file, how can i get it ?
Please, contact support@thunderoptics.fr with the serial number of your spectrometer and we will send the calibration file.
Is there any way to set the SMA to a long exposure time? Like 20 to 30 seconds? I am attempting to capture a Raman signal and need a much longer exposure than I am getting through Spectrogryph.
The SMA-E Spectrometer is not intended for Raman measurement. For such measurement, we recommend the use of an R-Spectrometer at least. The noise level of the SMA-E Spectrometer is high for Raman measurements.
Support Team
Still I am waiting for your answer.
I want to use your SMA Spectrometer
I would like to know if you provide an SDK.
Hello,
Thunder Optics delivers professional third-party professional software Spectrogryph along with the SMA-Spectrometer. The Spectrogryph is not open source software due to this reason access to the software code can not be provided.
Support Team
The SMA-E Spectrometer:
Installed the Spectrogryph software but the software was not able to connect to the spectrometer. After some searching I found out that the spectrometer is a webcam in the device manager.
Spectrogryph is somehow not capable of handling more than one webcam so it will see your computer webcam as leading and eventhough you select Thunder Optics, the drop down box will go blank and you get the message ‘no device connected’. My machine runs on WIN11.
Switched off my computer webcam in the device manager and then it worked, don’t know if it works oke.
The software Spectrogryph is not able to conect to the SMA-E spectrometer in my machine that runs on WIN10. I have switched off my computer webcam in the device manager and then it didn’t work, and everytime returns “no connection established” followed by an error message “Floating point division by zero”.I’d like some help to solve this. Could you help me?
Hello,
Please, contact us at support@thunderoptics.fr to schedule a call with the support team.
My Thunderoptics SMA-E/SMA Spectrometer (SN: TO 1000 21-166) works just fine on my Windows10 computer, but does not work on either of my two fully up-to-date Windows11 computers. Dr. Friedrich Menges at Spectragryph indicated it might be a problem with the DirectShow API, but my Win11 OS is fully up-to-date. He suggested that I get in touch with you for advice.
Thank you.
Dear Stephen,
Thank you for your message.
We have in our laboratories computers working on Windows11 and all is fine.
We are going to contact you by email to set up a visio help session.
Regards